🎙️ Is your radio refusing to transmit sound with a new microphone?
Fix it with a simple electret microphone adaptation circuit! 🛠️
✅ Works with mismatched wiring
✅ Supports 1000-ohm electret mics
✅ Reduces RF interference
✅ Easy for hobbyists and radio techs
🔧 Check out the full guide with a circuit schematic!
If you've ever connected a new microphone to an old radio and noticed there's no sound transmitted, you're not alone. This common issue happens when the internal wiring or audio circuit of the radio isn't compatible with modern electret microphones.
Thankfully, the solution is simple — with a bit of clever circuitry and a couple of components, you can make the two work together perfectly.
🎤 Why Some Microphones Don’t Work with Certain Radios
Some radios — even from the same brand — can fail to transmit audio when paired with newer microphones. That’s often because modern electret mics use different internal tablets and require power to operate. Older or differently designed radios don’t always supply this power, or they may use different pin configurations.
🧠 Understanding the Electret Microphone (1000 Ohms)
Electret microphones, especially those marked “1000 ohms”, need a small voltage (often around 8V) supplied through the audio pin to power their internal preamp.
If your radio feeds voltage via the mic line, great — but if not, or if the configuration is incompatible, you'll need a mic adaptation circuit.
🛠️ Components for the Mic Adaptation Circuit
Here’s what you’ll need:
-
1 × Electret microphone (1000 ohm)
-
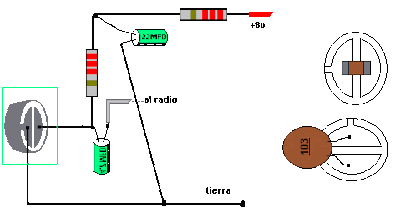
1 × Resistor (start with 4.7kΩ, or try 3.3kΩ for more gain)
-
1 × Capacitor (0.01µF) for RF filtering
-
Optional: Polyethylene foam for echo or soundproofing (if modifying the mic housing)
📐 Schematic Description
The basic setup is this:
-
Power (8V) flows through the resistor (R1) to the electret mic.
-
The mic output passes through a 0.01µF capacitor to eliminate high-frequency RF interference.
-
The ground must match the radio’s mic ground — avoid grounding from arbitrary points as it can introduce noise or hum.
If you’re replacing a dynamic microphone (which uses a coil and magnet), you can also fill the unused space with foam to improve acoustic isolation.
⚡ Tips for Proper Installation
-
The negative mic contact is usually constant in the mic plug.
-
Match grounds correctly — inconsistent grounding is a major cause of poor sound or buzz.
-
If the audio is too weak, try reducing the resistor value for higher current and gain.
-
Keep your wiring short and shielded if possible to avoid RF interference.
✅ Advantages of This Adaptation
-
🧩 Solves incompatibility between new microphones and old radios
-
🔇 Reduces RF noise with capacitor filtering
-
🎧 Improves sound clarity by providing proper mic power
-
💰 Low-cost solution with common components
🔧 Applications
-
Amateur (ham) radios
-
Walkie-talkies or CB radios
-
Public address (PA) systems
-
DIY audio communication setups
-
Mic replacements for old intercoms or audio devices
🎯 Final Thoughts
If your new microphone refuses to cooperate with your radio, don’t throw it away. A simple circuit using a resistor and capacitor can breathe life back into your transmission. This small fix can make all the difference in restoring clean, audible communication.
Whether you’re a radio hobbyist or just trying to get your equipment working again, this electret mic adaptation circuit is a smart and reliable fix.
#ElectretMicrophone #RadioHacks #MicAdaptation #DIYRadioFix #ElectronicsRepair #AudioCircuit #AmateurRadio #RadioMods


.webp)


